

A driveway can feel too small overnight. A new driver, a work truck, visitors, or a boat trailer can turn one tight parking spot into a daily headache.
A paver driveway extension adds usable parking without pouring a solid slab across the whole yard. Built with the right foundation, drainage, edges, and pavers, it can help protect the home from settlement and drainage problems.
I have seen good-looking extensions fail because the work below the pavers was rushed. Start with the ground, not the color sample.
Key Takeaways
- Plan the paver driveway extension around vehicle movement, finished heights, drainage, property lines, and local requirements before digging.
- Build the foundation carefully by removing soft soil, using vehicle-rated pavers, installing the correct aggregate in thin lifts, and compacting each layer thoroughly.
- Provide a deliberate transition to the existing driveway, durable edge restraints, and a suitable drainage route so water and lateral movement don’t damage the extension.
- Finish with properly filled joints, controlled cleaning, and regular inspections after storms to catch settling, erosion, or loose edges early.
Plan the paver driveway extension before digging
A paver extension should solve a parking problem without creating a water problem. Start with these design considerations before materials arrive. Decide how cars will enter, turn, and park on the new area.
Mark the footprint and finished height
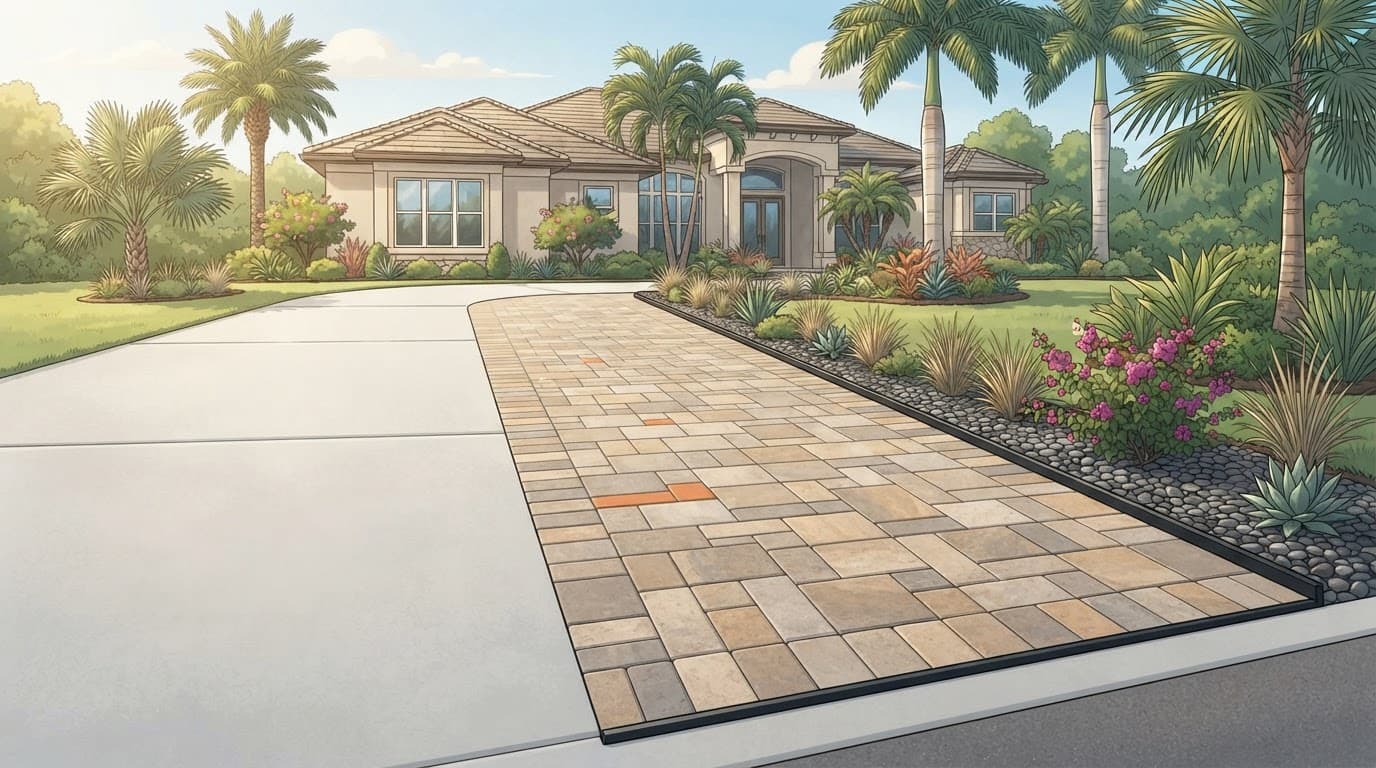
Draw the layout before digging. Include the existing driveway, proposed edge, finished height, nearby structures, and intended drainage direction.
Use marking paint, a garden hose, or stakes and string to lay out the extension. Stand at the street and view it from different angles. A simple rectangle often works, but a soft curve or border can help the parking area blend with the existing driveway.
Leave room for doors to open, map turning paths, and provide enough turnaround space for vehicles. Keep the edge away from grass and landscape beds where possible. If the extension meets a garage approach, sidewalk, screen enclosure, or pool deck, the finished height needs extra attention.
I also check the existing driveway for low spots, cracks, and settled areas. New pavers beside a sinking slab won’t stop old movement. The surfaces need a deliberate, clean transition, but they don’t have to be rigidly locked together.
Give rainwater a clear place to go
In Southwest Florida, heavy rain exposes every shortcut. Plan the slope so water runoff moves away from the house, foundation, garage, and other structures. Direct it toward a suitable swale, planted area, or approved drainage route, away from the property line and neighboring lots.
Where soil, groundwater, local rules, and site design allow, permeable pavers may help manage runoff. The EPA explains that permeable pavement can reduce runoff by moving water into the base below. They still need a properly graded base and an approved drainage route.
Water sitting on top of pavers is not always a paver problem. It can be a slope, base, edge, or drainage problem underneath.
Check permits, HOA rules, and underground utilities
Paperwork isn’t exciting, but fixing an unapproved driveway after the work is complete is worse. Local requirements can change by city, county, lot type, drainage district, and whether the work reaches the right-of-way.
Confirm local driveway requirements first
Call your local building or zoning department before you order pavers. Ask whether the widening affects the right-of-way, setbacks, stormwater management, driveway width, or impervious-surface limits. Also ask whether a permit, site plan, stormwater review, or right-of-way approval is required before ordering materials. If you have an HOA, get its approval in writing before work starts.
Terminology varies, so ask how the municipality’s current zoning by laws and building codes govern grades, drainage, materials, and construction details.
For example, Lee County states that a residential driveway permit application must be submitted through its Development Services Division. Cape Coral, Fort Myers, Bonita Springs, Punta Gorda, and Sarasota can have different rules, so don’t assume a neighbor’s project followed the same requirements. The linked example isn’t a substitute for confirming current requirements with the relevant city or county office.
A site sketch and any required drainage plans should show property lines, the existing driveway, the new paver area, and where water will go. That simple drawing can prevent a lot of back-and-forth later.
When grading, drainage, or right-of-way issues are complicated, a local unilock authorized contractor can review the proposed layout. You still need confirmation from the permitting authority.
Call 811 before excavation
Never assume you know where utility lines run. Irrigation lines, electrical lines, cable, gas, and water lines may be much closer to the driveway than expected.
Use the free 811 before-you-dig service before excavation. Allow enough time for markings, and keep those markings visible during the job. Hand-dig carefully near marked areas.
I don’t treat this as optional. A damaged utility line can turn a simple parking extension into an expensive emergency.
Build a sub-base that can carry vehicles
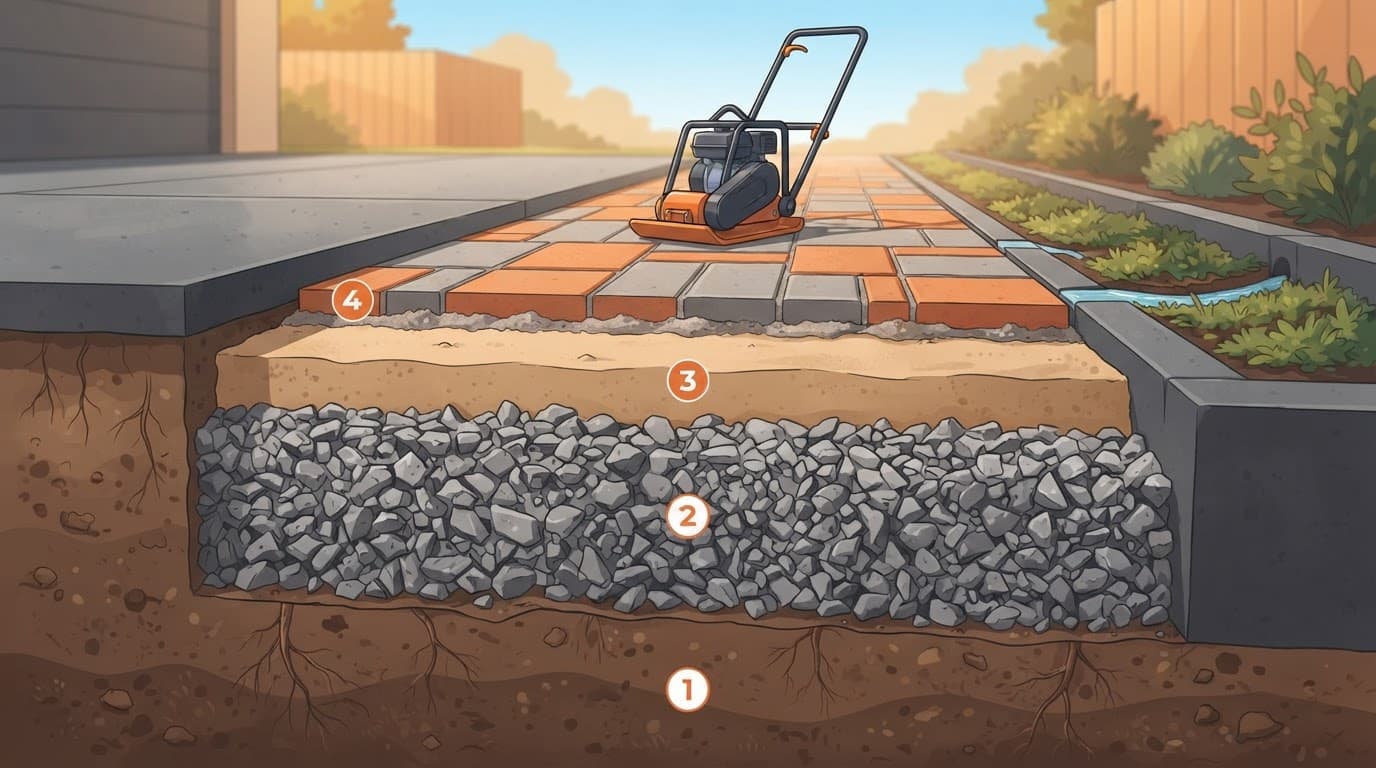
The pavers are the finished surface, but the compacted sub-base carries repeated vehicle loads. If the soil is soft or the stone base is thin, pavers can sink, spread, or become uneven.
Excavate to the correct depth
For a typical driveway extension, calculate the excavation from the planned finished grade and existing driveway. Allow room for paver thickness, about 1 inch of bedding sand, and a compacted crushed-stone base. Many residential builds need roughly 6 to 8 inches below the planned finished surface. Weak soil, poor drainage, heavy vehicles, or a required finished elevation may call for more.
The goal isn’t one magic depth. Set the final depth from the finished grade and existing driveway, not a universal rule.
Remove roots, loose organic soil, and soft spots first. Shape the native soil to the intended slope, then compact it before base stone goes down. Install aggregate in thin lifts, compacting each one thoroughly. If the ground feels spongy under equipment, rework that area now. Don’t bury it under stone and hope for the best.
Choose vehicle-rated pavers and base material
Use driveway pavers rated for cars and light trucks, usually at least 2 inches thick. Patio pavers may look similar, but a parking surface must handle vehicular weight, braking, and turning forces. Two inches is a common minimum, but site conditions and manufacturer guidance control the final selection.
The chosen crushed aggregate should meet the applicable installer, engineer, or local specification. A common build includes:
- Compacted native soil, shaped for proper slope.
- Crushed stone or crusher run installed in thin lifts and compacted well.
- A thin, even bedding layer of concrete sand, not a thick layer used to hide an uneven base.
- Interlocking driveway pavers, edge restraint, and joint sand.
Stone dust shouldn’t automatically replace the specified compacted aggregate or bedding sand. Material terminology varies locally, so confirm the appropriate gradation and drainage behavior with the installer.
For overflow parking, permeable plastic grids with grass can work in the right location. They need a properly prepared aggregate base and regular care. I would not use a grass grid as a substitute for a solid, vehicle-rated paver extension where cars park every day or turn their wheels often.
Install the pavers in the right order
A clean paver pattern is satisfying to look at, but installation order matters more than almost anything. The aggregate base carries vehicle loads, while bedding sand supports and levels the pavers.
Compact the base in thin lifts
Place the aggregate base in manageable lifts, then compact each layer with a plate compactor. Adding all the base at once and compacting only the top leaves weak material underneath.
Check slope often with a string line or laser level. Bedding sand should follow the established grade, not create it. Never dump extra sand over an uneven base. Stone dust also shouldn’t be used as a thick corrective layer when concrete sand is specified. It can make grading and drainage less predictable.
A strong driveway extension feels solid from the first day. It shouldn’t rock, bounce, or develop a soft tire track after the first few storms.
Screed the sand and set the field pavers
Spread concrete sand in a consistent layer, usually about 1 inch before final compaction. Screed it smooth using rails and a straight board. Once it’s level, don’t walk all over it.
Start at a straight, stable edge and work outward. Keep joint spacing consistent and check the pattern as you go. A herringbone layout is a strong choice for driveway pavers because the interlock handles wheel movement well.
Cut edge pieces with the correct saw and safety gear. Small slivers at the outside edge tend to loosen, so adjust the layout or widen the border when possible. Use a wet saw with masonry blades, eye protection, hearing protection, and gloves. Work from stable footing and handle the saw carefully.
Install a durable edge restraint against every exposed perimeter and at transitions before final compaction. Anchor it according to the product instructions, and don’t rely on the pavers alone to contain lateral movement.
Match the old driveway without forcing a perfect match
New pavers beside an existing concrete or asphalt driveway won’t always match perfectly. Sun, tire marks, sealer, and years of weather change color, and that’s normal.
Use borders and transitions to make it look intentional
A contrasting soldier-course border can separate new pavers from the existing surface cleanly. A complementary blend or clear transition makes the change look planned instead of patched together.
I also look at the home’s roof color, exterior paint, landscape stone, walkway pavers, and garage elevation before selecting a blend. A small sample can look different in full Florida sun. Put samples outside and view them morning, afternoon, and after rain.
Where new pavers meet an existing slab, establish the finished heights carefully. Provide a clean separation or movement joint, avoid a lip that catches tires, and keep debris from collecting in the gap. Concrete and pavers move differently, so don’t force them into a rigid connection that can crack.
Compare costs the honest way
Pavers can cost more upfront than a basic concrete extension, especially when you choose a detailed border or premium finish. Compare the complete installation, not just the paver price. A paver system also has practical repair value, since individual pavers can be lifted, the base repaired, and the same pavers reset if water or soil movement causes settling.
When comparing estimates, make sure each quote includes excavation, hauling, base depth, compaction, drainage work, cuts, edge restraint, joint sand, and cleanup. A low number that skips base preparation isn’t a bargain.
For a project in Fort Myers, Cape Coral, Bonita Springs, Punta Gorda, Sarasota, or nearby areas, you can Get a Free Quote. I can look at the existing driveway, grade, drainage, and layout, or you can consult a Unilock authorized contractor for a site-specific assessment before committing.
Finish joints and protect the new surface
The final details lock the system together. Loose edges and empty joints can allow movement, even when the base is good.
Fill the joints with polymeric sand
Wait until the pavers are fully compacted before filling the joints. Sweep polymeric sand across the surface until every joint is full. Remove excess material according to the manufacturer’s directions, then apply water carefully so the binder activates without washing sand away.
Polymeric sand supports interlock, but it can’t correct a weak base, failed edge restraint, poor slope, or ongoing drainage problem. Ants, concentrated water flow, and aggressive cleaning can still damage joints over time.
Inspect the joints after major storms, and replenish low areas before pavers start shifting. Don’t patch eroded joints with loose stone dust or random fill material. Clean the joints first, then replenish them with the specified joint material.
Remove leaves, mulch, and soil before weeds establish. Debris holds moisture and creates a place for weeds to grow.
Clean with care, not maximum pressure
Routine maintenance is especially important under trees or in shaded areas where algae grows. Mild soap, water, and a brush handle many routine cleaning jobs.
Pressure washing can remove heavy dirt, but use controlled pressure to protect pavers and nearby landscaping. Keep the stream out of the joints, and replace lost joint material promptly.
Don’t use cleaning to cover up drainage or settling. If pavers become uneven, soft, or loose, check the base and water flow before sealing or merely adding sand.
Frequently Asked Questions
How deep should a paver driveway extension be excavated?
Many residential driveway extensions need roughly 6 to 8 inches below the planned finished surface, including the pavers, bedding sand, and compacted base. Weak soil, poor drainage, heavy vehicles, or elevation requirements may call for more, so set the depth from the actual site conditions.
Can pavers be installed next to an existing concrete driveway?
Yes, but the finished heights and transition need to be planned carefully. Provide a clean separation or movement joint, avoid a tire-catching lip, and don’t force the concrete and pavers into a rigid connection because they move differently.
Do I need a permit for a paver driveway extension?
Possibly. Requirements can vary by city, county, right-of-way conditions, setbacks, drainage rules, impervious-surface limits, and HOA regulations, so confirm current requirements with the relevant local offices before ordering materials.
Are all pavers suitable for a driveway?
No. Choose pavers rated for vehicles, usually at least 2 inches thick, rather than patio pavers that are intended only for foot traffic. The correct base and compaction are just as important as the paver itself.
How should a new paver driveway extension be maintained?
Inspect the surface and joints after major storms, remove leaves and soil, and replenish low areas with the specified joint material. Use mild soap or controlled pressure when cleaning, and investigate settling or standing water instead of trying to hide the problem with extra sand or sealer.
A Driveway Extension Should Feel Like It Belongs
A well-built paver driveway extension adds parking space, curb appeal, and a durable surface that fits the home. The pavers matter, but long-term performance comes from excavation, compaction, drainage, and strong edge support.
I always recommend confirming permits and local requirements, calling 811, and establishing the finished grade before work begins. If soil, drainage, utility, or transition conditions are uncertain, consult a qualified local professional. A careful plan helps the extension stay stable, look integrated, and provide useful parking for years.