


A beautiful walkway can become a problem when lights are installed by cutting into the paver base. The goal with paver walkway lighting is safer footing at night while preserving the compacted base, bedding sand, and drainage. Route low-voltage wiring through the landscape edge or another serviceable perimeter path, rather than cutting through the compacted center of a finished walkway. This helps prevent washed-out sand and settlement after heavy Florida rain.
I have seen homeowners install a good-looking fixture, then find rocking pavers after the next heavy Florida rain. The fixture wasn’t the problem. Disturbed bedding sand, aggregate, drainage, or edge restraint caused the movement.
This article compares recessed, surface-mounted, solar, and edge-mounted approaches. I’ll favor methods that provide access for future service without disturbing the finished base.
Key Takeaways
- Plan paver walkway lighting around how people use the path, placing fixtures at steps, turns, gates, entry points, and other changes in elevation.
- Route low-voltage cable through a protected landscape edge instead of cutting through the compacted center of the walkway.
- Match each fixture to the paver size, location, and expected load; pedestrian, step, driveway, recessed, and solar fixtures have different requirements.
- Correct drainage problems before installation, since Florida rain, irrigation overspray, and runoff can wash out bedding sand and damage electrical connections.
- Maintain the lights with gentle cleaning and early troubleshooting, while having complex wiring, utility crossings, or compromised bases professionally inspected.
Plan Paver Walkway Lighting Before Moving Anything
The best time to solve installation problems is before a single paver comes out. I start planning paver walkway lighting by looking at how people use the walkway after dark. Is it the route from the driveway to the front door, or a connection between outdoor spaces? Does it lead to a pool cage, patio, side gate, or dock area?
If it connects to a patio, coordinate the transition with the paver patio lighting. Lighting should help people see changes in direction, steps, borders, and uneven areas. It should make these outdoor spaces safer to navigate, not turn the walkway into a runway.
Map the walking path and fixture locations
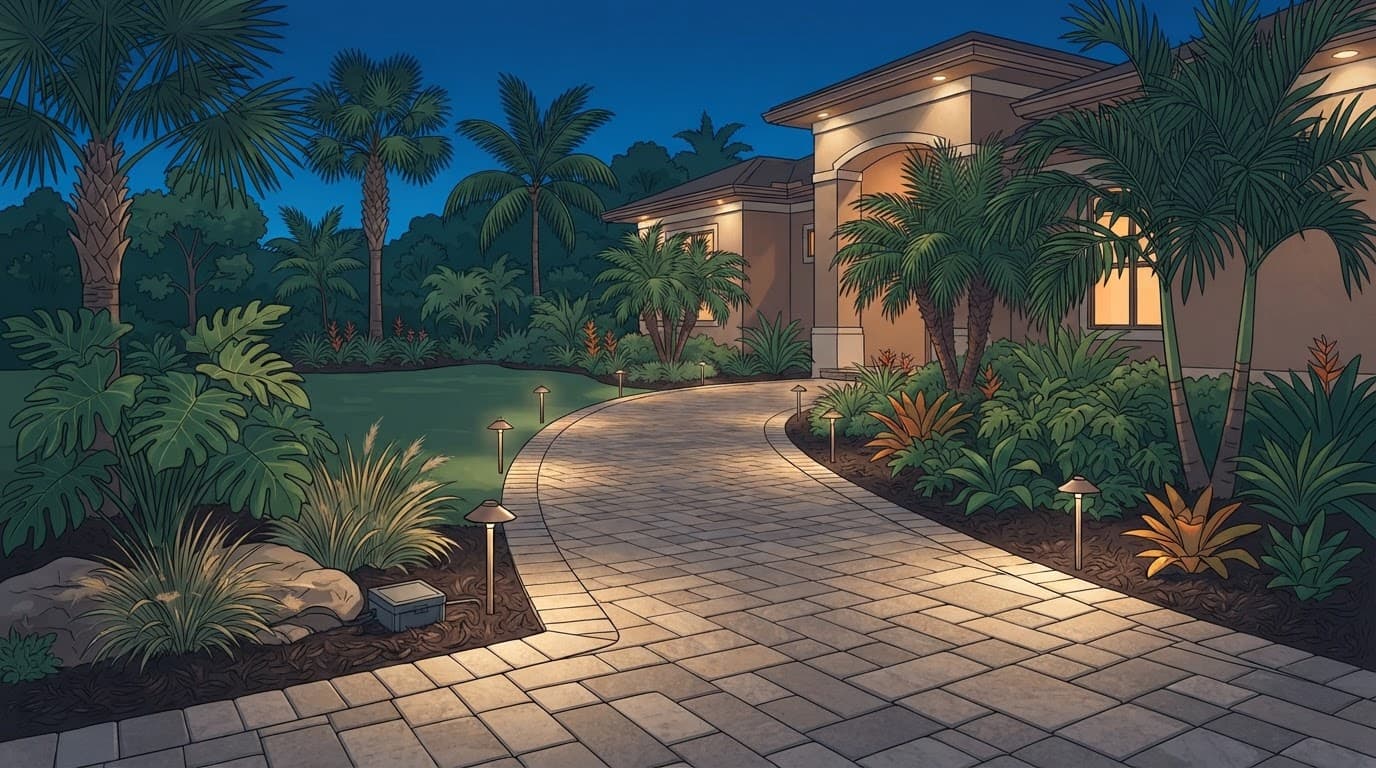
Mark light locations with small flags before digging or lifting pavers. I usually place paver step lights at risers and changes in elevation, then add fixtures near turns, gates, and entry points. Test these flags and mock fixture locations as paver lighting ideas before filling longer runs with enough spacing to avoid dark holes.
For a planned layout, I usually use low voltage paver lights and choose compact LED paver lights for each location. Keep fixtures away from areas where tires, garbage bins, lawn equipment, or furniture will hit them. Near a driveway, choose driveway paver lights only when they’re rated for vehicle loading. Patio paver lights suit pedestrian areas and don’t have to handle the same abuse.
In-ground paver lights can provide a flush or recessed option, but the cable should still approach from the edge. The fixture must not undermine the paver or bedding layer. I use dependable wired fixtures in shaded or obstructed locations, where solar-powered paver lights may not charge well.
Look at the view from inside the house too, since good landscape lighting design controls glare, plant growth, and sightlines. Use warm light across the pavers, not bright dots shining into a window. This protects curb appeal and complements the home’s exterior lighting.
Find utilities before the work begins
Call Sunshine 811 before any digging. Irrigation lines, pool equipment plumbing, drainage pipes, existing electrical wiring, and landscape cables may be close to the walkway.
This matters even on a small project. A shallow trench can still cut an irrigation line or damage a wire feeding pool equipment. Mark utilities even when the planned cable is shallow. I also check downspouts, irrigation overspray, and existing flow paths before choosing fixture locations. Correct drainage problems before excavation or new electrical work begins. The map should identify low spots and stormwater escape routes, not just fixture spacing.
A paver base is not empty space for wires. It is a compacted support system that keeps every paver level.
Choose Low-Voltage Lights That Fit the Paver Layout
Most homeowners are best served by LED paver lights in a low-voltage system. With low voltage paver lights, the fixture, cable, connectors, and transformer must work together as one compatible system. These energy-efficient, weather-resistant fixtures run cooler than older bulbs and suit everyday path lighting.
Paver solar lights can look attractive in a display, but solar-powered paver lights may disappoint on a shaded walkway. Southwest Florida landscaping grows fast. Palm fronds, oak canopies, screen enclosures, and cloudy summer weather can obstruct the solar panels’ collection area, leaving fixtures dim before night is over.
Match the fixture size to the existing pavers
A 4×8 fixture may fit a standard brick-shaped paver pattern, as brick paver lights are designed to do. A set of 6×9 paver lights can work better in a larger modular design. Measure the actual paver before choosing LED paver lights, not just the pattern name.
Some pavers vary slightly by manufacturer and age. A mismatch with 6×9 paver lights can create wide joints or force unnecessary cuts into surrounding pavers. Both problems make repairs harder later, particularly when replacing in-ground paver lights.
In-ground paver lights are flush or recessed, unlike surface-mounted path lights. They don’t justify digging into the base or routing cable beneath the walkway.
Belgard paver lights and Kerr Lighting kits are common hardscape options, but brand availability doesn’t replace measuring the installed paver. I look beyond the brand name. Whether you choose Belgard paver lights or another fixture, check its housing, lens, replacement support, and fit.
Patio paver lights suit pedestrian areas, while driveway paver lights need housings rated for tires and vehicle loads. Near a stair or raised transition, choose paver step lights carefully. Even lighted pavers need the same structural support as an unlit paver.
Pick light output that is useful, not harsh
A walkway needs soft, even guidance from LED paver lights, not stadium lighting. Low-output fixtures placed properly usually outperform a few overly bright ones.
Warm white lighting often works well with tan, red, charcoal, and other light-colored pavers in adjacent outdoor spaces. Cool white can look too blue against warm brick colors. Good paver patio lighting should coordinate with seating and entertaining areas. A landscape lighting design should account for beam spread, plant growth, glare, and paver color.
For practical paver lighting ideas, test one fixture at night before buying a full set. When extending paver patio lighting, keep its brightness consistent with nearby seating and entertaining areas.
The best exterior lighting shows each step, blends into the hardscape, and improves curb appeal around nearby outdoor spaces.
Protect the Base During Paver Light Installation
The paver system has four layers: pavers, bedding sand, compacted aggregate, and soil below. Each layer supports the next, and lighted pavers still depend on that structure. A disturbed layer that isn’t rebuilt correctly can cause sinking, shifting, open joints, or water pooling.
I do not recommend running cable under a finished walkway’s center unless that area is properly lifted and rebuilt. Preserving the base matters more than hiding a cable, so protect the electrical wiring route and keep service connections accessible.
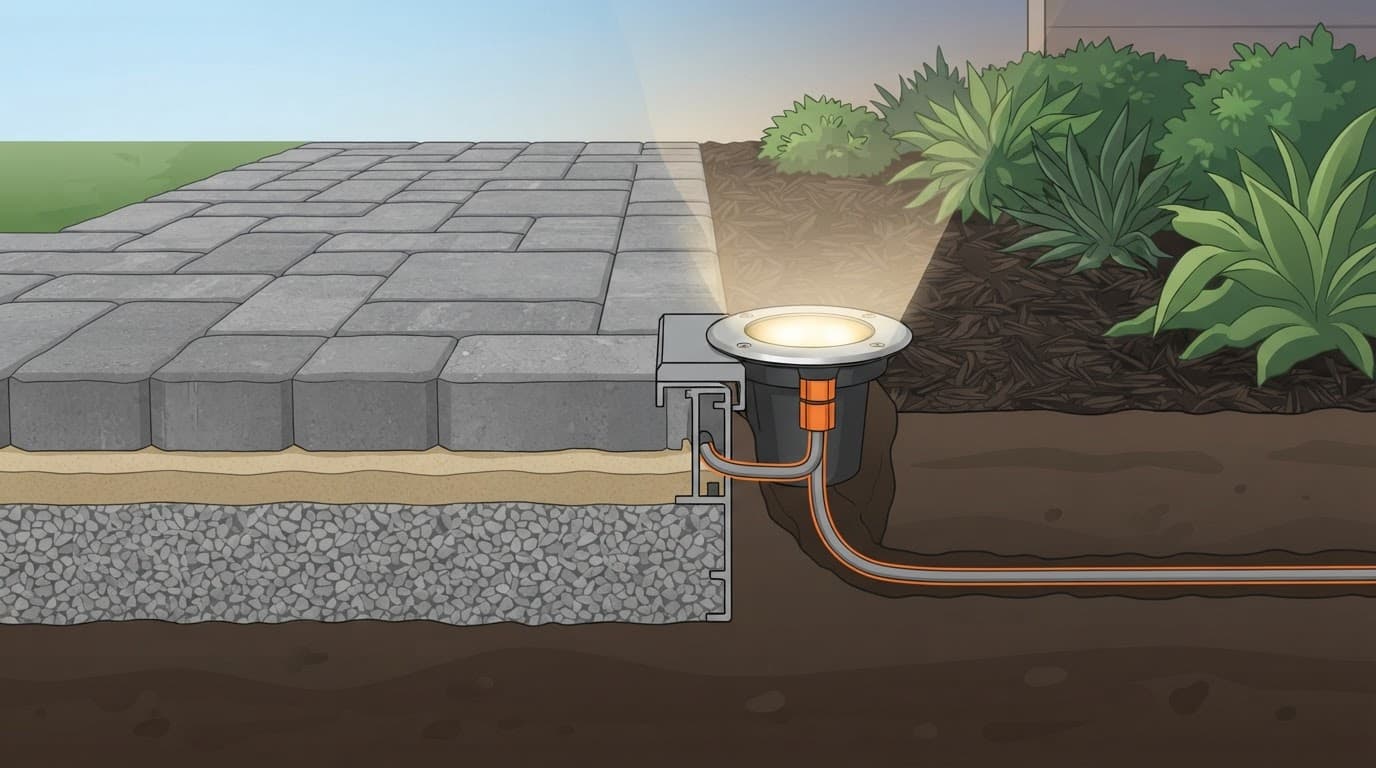
In-ground paver lights are flush fixtures. Install them only by lifting the exact paver, preserving the bedding profile, and restoring full support. They do not justify excavating a channel through the base. Recessed LED paver lights should use sealed housings.
Route wire through the landscape edge
Among paver lighting ideas, routing along a protected edge is the least-invasive hardscape lighting option for outdoor spaces. Run low-voltage cable through soil beside the walkway, with short leads from a landscape bed or side border to each patio fixture. It protects the compacted base, suits paver patio lighting, and leaves a service path through connected outdoor spaces.
For a border or stair location, lift only the pavers needed for paver step lights at that exact position. Keep the removed pavers in order. Avoid scraping out large amounts of bedding sand, and do not dig into the aggregate base to make room for wire. Use weather-resistant connectors and fixture housings, but remember they do not replace proper drainage or burial protection.
After the fixture is installed, reset each paver flush at the correct height. Refill joints with suitable sand and make sure the surface stays locked together.
Do not use loose sand to correct a low spot
A rocking paver needs investigation, not a shovel full of loose sand. First identify the cause, then lift only the affected units and inspect for washout or a failed edge. Rebuild and compact any disturbed material in appropriate layers, reset the pavers flush, and refill the joints with suitable sand.
The same rule applies when a lighting project exposes a weak edge. Do not hide a soft spot with a new fixture. Stop the lighting installation if you find a soft edge or drainage failure, since heavy rain will find it again.
I check the walkway base, edge restraint, joints, and drainage as one system. A new light should never be the reason a good walkway begins to move.
Handle Wiring, Transformers, and Voltage Drop Correctly
Low voltage is safer to work with than household voltage, but it isn’t risk-free. The low voltage transformer needs enough capacity for every fixture, plus room for future additions.
Add the wattage of every fixture, including low voltage paver lights, not just the largest fixture. Choose a transformer that won’t operate at its limit each night.
For example, ten 3-watt LED paver lights use 30 watts. LEDs are energy-efficient, but voltage drop and safety concerns still require proper transformer sizing. A transformer rated well above that load gives the system breathing room and allows future additions.
Place the low voltage transformer near a GFCI-protected outdoor receptacle where required. Follow the manufacturer’s instructions and current local code when adding a timer or photocell. In outdoor spaces, keep it accessible for service, but protect it from irrigation and standing water near your outdoor living space.
Use the right cable for the run
Long runs can cause voltage drop. The lights closest to the transformer may look bright while the far end looks weak or yellow. Plan the cable route with the hardscape lighting layout, then choose larger wire to reduce that problem.
For short pathways, 14-gauge cable may work. Longer runs and larger groups of fixtures often need 12-gauge cable. For LED landscape lighting, a hub layout with several shorter runs can keep fixture brightness more even than one long daisy-chain.
Proper wire sizing, sealed or listed weather-rated connectors, and safe transformer loading support safety and efficiency. Loose wire nuts buried in wet soil invite flickering lights and corrosion.
Have a qualified electrician handle any added or modified line-voltage electrical wiring. Choose professional installation for complex crossings or uncertain site conditions.
Follow burial depth and local requirements
The cable route should stay in soil, not mulch, where edging or raking can damage the electrical wiring. If driveway paver lights cross a driveway or vehicle area, follow local code and fixture instructions. Use the protection and burial method they require.
The IAEI guidance for low-voltage lighting notes deeper protection is needed where cable passes beneath driveways or parking areas.
For typical low-voltage landscape cable, review NEC burial guidance for outdoor wiring and confirm the current requirement with your local building department. Don’t rely on a generic burial depth, because requirements vary by system, location, and local rules.
Don’t guess near driveway crossings, pool equipment, right-of-way areas, or screen-enclosure zones. These outdoor spaces may require different protection, permits, or safety measures.
Keep Water Away From the Paver Base
In Southwest Florida, water is usually the bigger threat. Even properly sealed LED paver lights can fail when runoff washes out bedding or aggregate, or pools around electrical connections.
After a strong rain, I watch the property before installing fixtures. I look for runoff crossing the walkway, roof discharge, irrigation overspray, failed grading, or pooling. I check drainage paths through outdoor spaces around patios, pool areas, and side gates. Then I protect the paver edge from concentrated discharge and keep connections out of low spots.
Paver solar lights still need a firm, well-drained location. They don’t solve standing water, and their energy-efficient operation matters only after drainage is corrected.
Correct drainage before adding fixtures
Extend a downspout if it empties beside the walkway. Repair broken irrigation heads that spray the same border every day. Grade nearby soil so water does not sit against the paver edge.
Keep drainage paths clear across connected outdoor spaces.
Don’t pour concrete over a moving paver border to hold it in place, because concrete and pavers respond differently to movement. A fixture, including lighted pavers, can’t stabilize a moving border. A rigid strip can trap water, crack with movement, and make future repairs to pavers and electrical wiring more invasive.
If the walkway meets a pool deck or screen enclosure, use extra caution. Patio paver lights and paver patio lighting must respect the drainage path through this outdoor living space. The enclosure footing and paver system are separate structures. Don’t drill into the footing, move anchors, or alter screen posts to place lights.
Check permits when the scope changes
Replacing a few pavers and adding low-voltage fixtures may be routine work. New line-voltage supply, grade changes, structural work, pool or enclosure interfaces, and substantial excavation can require different approvals.
Requirements vary across Fort Myers, Cape Coral, Bonita Springs, Punta Gorda, Sarasota, and nearby communities. I recommend checking with the local building department before work starts when the project involves:
- Changing grades or drainage
- Approaching a right-of-way
- Adding a new line-voltage supply
- Structural work or pool and enclosure interfaces
- Substantial excavation
Maintain LED Paver Lights Without Hurting the Surface
Hardscape lighting needs simple maintenance. Dirt, mulch, insect nests, algae, and sprinkler overspray can cover lenses and reduce the light output. Salt air near the coast can also affect exposed hardware over time in outdoor spaces.
A few minutes of care each season helps you catch a small issue before it becomes a wiring repair. Energy-efficient systems still need seasonal checks in outdoor spaces. Check paver patio lighting and connected walkways together, especially when they use the same paver lighting ideas. Solar-powered paver lights also need clean panels and healthy batteries.
Clean fixtures with a gentle touch
Switch off the system before cleaning. Wipe each lens on LED paver lights with water, mild soap, and a soft cloth. This maintains light output, limits glare in exterior lighting, and protects curb appeal. Clear mulch and soil from fixture edges without digging into joints or the base. Check fixture spacing in your landscape lighting design as seasonal plants grow.
Avoid aiming a pressure washer directly at the light, paver joints, or fixture seals. High pressure can chip the paver face and blast out joint sand. Once enough joint sand is gone, the pavers lose the interlock that helps hold the walkway tight. Do not pack loose sand around a fixture or drill the paver in place as a quick fix.
Troubleshoot dimming and flickering early
If one of the LED paver lights is dim, first check for a dirty lens, loose connection, damaged lead, or water inside the fixture.
Location affects exposure, load, and access. In-ground paver lights face moisture, while patio paver lights see foot traffic. Driveway paver lights handle heavier loads, and paver step lights need clear access.
If several LED landscape lighting fixtures at the end of the line are dim, check for voltage drop or an undersized wire. A low voltage transformer problem may also affect the line.
A fixture that flickers after rain often points to moisture at a connection. System-wide LED landscape lighting flicker may signal moisture or damaged electrical wiring.
Do not keep resetting the transformer and hoping it stops. Inspect the connection and replace damaged connectors or housings with weather-resistant parts. For Belgard paver lights, match replacement connectors or housings to the manufacturer’s parts, and never bury a damaged connection.
When lighted pavers start rocking, stop using that area as a quick repair. Have the support, edge restraint, and drainage structurally inspected. Complete those checks before reuse, rather than replacing the cosmetic fixture, to protect safety and efficiency.
Frequently Asked Questions
Can I run lighting wire under an existing paver walkway?
It is better to route low-voltage cable through the landscape edge or another serviceable perimeter path. Cutting through the compacted base can disturb bedding sand, drainage, and aggregate, leading to rocking or settled pavers.
Are recessed paver lights safe for the walkway base?
Recessed or in-ground paver lights can work when the exact paver is lifted and its full support is restored. The fixture should not require a channel through the aggregate base or undermine the bedding layer.
Are solar paver lights a good choice in Southwest Florida?
Solar-powered paver lights can work in open, sunny locations, but palms, oak canopies, screen enclosures, and cloudy weather may leave them dim. Wired low-voltage LED fixtures are usually more dependable in shaded or obstructed areas.
What wire size is best for low-voltage paver walkway lighting?
Short pathways may work with 14-gauge cable, while longer runs or larger groups of fixtures often benefit from 12-gauge cable. Proper wire sizing helps reduce voltage drop and keeps fixtures at the far end of the run from appearing dim or yellow.
When should I call a professional for paver walkway lighting?
Professional installation is recommended for line-voltage work, difficult utility crossings, driveway or pool interfaces, substantial excavation, or a compromised paver base. Stop the project if you find drainage failure, a soft edge, or movement around the walkway.
Get the Lighting and Base Right the First Time
Good paver lighting ideas start with considering fixture placement, low-voltage electrical work, drainage, edge restraint, and paver support together. Soft LED paver lights can improve curb appeal while providing energy-efficient illumination after dark. If you’re considering Belgard paver lights, confirm their dimensions and installation requirements first.
I have spent more than 20 years working with pavers in Florida conditions, and I know a solid base is never the place to take shortcuts. A level, supported walkway is the real foundation of a good lighting project. Projects involving line voltage, difficult utility crossings, pool or enclosure interfaces, or a compromised base may call for professional installation.
If you are planning new lights or see movement around an existing walkway, Get a Free Quote and I can evaluate the pavers, base, drainage, and layout before work begins. Careful, limited access is preferable to cutting through or destabilizing the base, helping protect walkways, patios, and entrances in your outdoor spaces.