


A pool deck can look finished and beautiful, then one plastic cover catches your eye every time you walk outside. A flush paver insert can blend it into the deck while keeping the cover lift-out and serviceable. Never glue it, bury it, cover it with loose material, or permanently obstruct access.
I have seen homeowners set the cover too tightly, glue pavers where they should not be glued, or level the surface with loose sand. Any retrofit must be compatible with the existing pool system, skimmer basket, and surrounding deck. A low, loose, or raised cover can create trip and slip hazards, making pool safety a concern.
The right approach keeps the skimmer housing accessible while making it blend into the rest of your pool deck.
Key Takeaways
- Use a purpose-built removable access cover with a supported paver or tile insert instead of placing pavers directly on a plastic skimmer lid.
- Measure the actual clear opening, support ledge, finished deck elevation, insert thickness, tray dimensions, and required lifting clearance before ordering a system.
- Set the frame and insert flush with the surrounding deck, while keeping the lid stable, level, clean, and easy to remove with the supplied tool.
- Correct settling, drainage, loose bedding, and unstable support around the skimmer before installing the cover.
- Never permanently obstruct the skimmer lid, and call a qualified professional when the box, base, utilities, drainage, or structural support are uncertain.
Never Pave Over the Skimmer Access
The pool skimmer needs regular access for cleaning, inspections, basket removal, and repairs. A paver installation should hide the lid, not trap it beneath a permanent surface.
A standard plastic lid isn’t structural support for a heavy paver. It can flex, crack, or settle low under repeated foot traffic. I recommend a purpose-built access cover with a removable insert system for a clean, durable finish.
Start With the Skimmer Box Size
Measure the pool skimmer box from the actual clear opening inside the deck, not from the old lid alone. Record the support ledge and finished deck elevation too, since both affect the final fit.
Measure these areas before ordering anything:
- The actual clear opening length and width.
- The depth from the support ledge to the finished deck elevation.
- The thickness of your paver, stone, tile, or concrete insert.
- The dimensions of the frame or collar.
- The clearance around coping, plumbing, waterline tile, and curved deck borders.
- The space required to lift the cover clear and use the supplied tool.
Check the surrounding coping, plumbing, and deck borders before finalizing the layout. Tight cuts near pool coping, waterline tile, and curved edges need more planning.
Do Not Block Pool Service
The finished cover must lift out with the supplied tool, without chipping adjacent pavers or scraping the deck. A flush finish doesn’t mean the opening is sealed or permanently trapped; it should still open in seconds.
A hidden skimmer lid is only a good installation when a pool technician can remove it and reach the basket quickly, without pulling up surrounding pavers.
If the basket is hard to reach now, fix that problem before the pavers go in. A raised edge or uneven cover can create a trip point and compromise pool safety. I do not want to see a homeowner forced to pry against a brand-new travertine deck just to clean the skimmer.
Measuring Pool Skimmer Lid Pavers for a Flush Finish
The biggest mistake is ordering a cover tray from paver dimensions alone. The required tray size, support depth, and finished elevation matter just as much. Measure the full recess, then match the insert to that inlay depth. It should sit level with the surrounding deck, never above it or in a low pocket that holds dirty water.
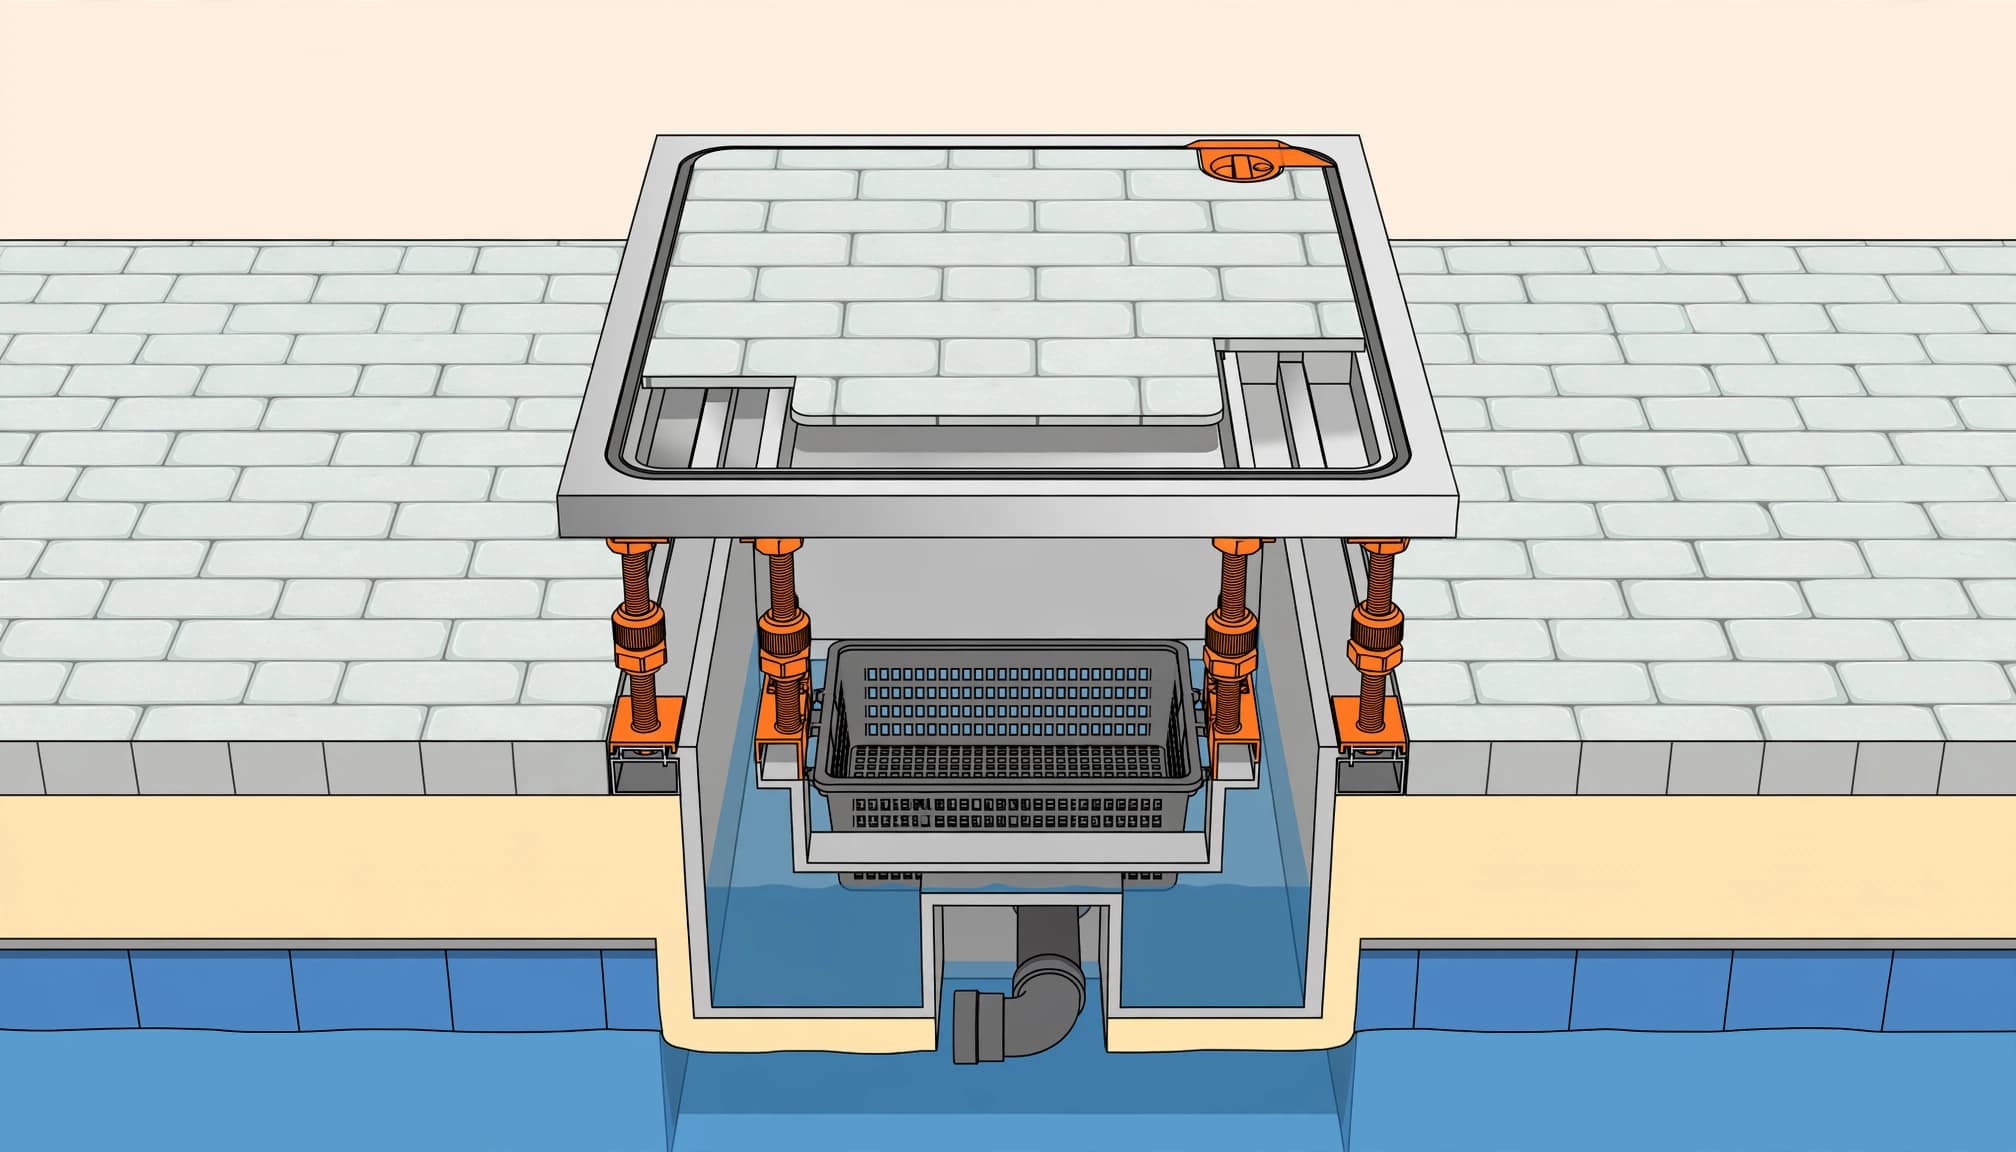
A quality access cover needs an adjustable tray that supports the insert at the right height. Don’t assume every kit offers the same adjustment range. Use the selected manufacturer’s current documentation, such as the HIDE skimmer cover installation instructions, before choosing a kit or starting a retrofit.
Add Up the Full Material Stack
I measure the actual tile thickness or paver thickness with a tape, even when the supplier lists a standard size. Stone products can vary. Tumbled travertine and shellstone often have more variation than manufactured pavers.
Your total stack includes:
- The measured thickness of the paver or tile.
- The adhesive or mortar thickness below the insert.
- The metal tray base.
- The support hardware below the tray, including a height adjuster when specified.
- The available adjustment range in the tray and supports.
Leave enough adjustment range to set the insert level with the finished deck after the whole deck is laid. Excessive mortar can’t substitute for an accurately measured inlay depth. Too much material can crack, hold moisture, and make the cover hard to remove.
Match the Cover to the Surface
A stainless steel skimmer cover works with many finishes, but the tray must match the insert material and depth. Stone pavers, a tile insert, timber decking, artificial turf, porcelain tile, and natural stone can work when the chosen tray, adhesive, weight limit, and existing pool system support them.
For a cohesive pool deck design, I prefer an insert cut from the same material and pattern used around it. Match the paver direction and joint layout to the surrounding field. If the field pattern runs straight across the deck, the insert should continue that line, and the cover can disappear into the design when the joints line up well. Confirm unusual materials with the manufacturer before cutting.
Choose a Cover That Can Handle Pool Conditions
A cheap plastic lid may work as a temporary replacement. A stainless steel skimmer cover is a load-supporting insert system, not simply a decorative replacement.
Many premium systems use 316L marine-grade stainless steel. It helps resist humidity, salt air, and chlorinated water. The complete system should also handle routine wet-foot traffic around Southwest Florida pools. Still, confirm the exact model suits your pool and deck conditions.
Why Stainless Steel Frames Matter
The metal tray supports the insert. The frame protects the surrounding paver edge, where chipping is most likely.
A well-made access cover includes adjustable supports and a removal tool, so you can lift the lid without wedging a screwdriver into the stone. The full assembly normally includes a tray, outer frame, and an edge protector that shields the paver or stone edge from chipping. Check that it fits the existing skimmer box, is rated for pedestrian pool-deck use, and supports the insert’s stated weight rating.
Confirm that the exact model and finish carry a written 10 year warranty before buying.
You can review the typical cover parts and purpose of the HIDE safety key for safe removal before deciding which system fits your deck.
Plastic Lids Still Have a Place
Not every pool needs a removable concealed system like hidden skimmer covers. If the lid is outside the main deck area, in a utility corner, or your budget is tight, a good replacement plastic lid can be practical. It shouldn’t be sealed, obstructed, or used as a structural base for pavers.
But when you are resurfacing a pool deck, installing travertine, or repairing a visible section of pavers, a supported insert looks much more complete. It also contributes to pool safety by creating a stable, walkable surface. I see it as a finish detail, much like matching a new paver repair to the existing color and texture.
Prepare the Deck Base Before Setting the Frame
A skimmer cover is only as stable as the surface around it. Loose pavers, washed-out bedding sand, poor drainage, or a shifting concrete collar can throw off the finished height.
Before I set the access cover frame, I inspect the whole section around the skimmer opening. The frame needs a firm, even perimeter, and nearby pavers should feel solid underfoot. Look for rocking, open joints, soft spots, or puddles after rain.
Correct Water Problems First
Water is a major reason pavers settle around pools. Check runoff, low spots, washed-out bedding, soil movement, and puddling where the deck meets the pool coping. Where surface water keeps pooling, pool deck drainage channels can carry it away before it reaches the base. A drainage cover isn’t a substitute for the skimmer’s removable service lid, and it shouldn’t be used to block or redirect the opening.
Don’t rely on loose sand under one low paver to correct the height. Reset the surrounding pavers, correct the base, and restore joint sand before fitting the lid. The frame needs stable, even support on all sides.
If you have travertine or another natural stone, use a pH-neutral cleaner. Vinegar and acidic products can etch calcium-based stone. Follow the selected tray and adhesive manufacturer’s installation instructions. The Skimmer Lids installation guide explains how to bond an inlay to a stainless steel tray.
Dry-Fit Every Piece
Place the frame, tray, paver insert, supports, and any adjustable collar in position before applying adhesive. Check the joint lines from several angles, then stand over the lid and look across the deck surface.
Confirm the lid lifts freely, sits level, and has a small, even reveal around the frame. It shouldn’t rattle or bind, and loose sand shouldn’t be used to correct its height.
Install Pavers Around the Pool Skimmer Lid
Once the base is stable and the cover depth is set, installation becomes more straightforward. Take your time around this small area. One rushed cut can make a high-quality pool deck look unfinished.
Treat the complete frame-and-tray assembly as a removable access cover, not a permanent deck fitting. It must lift out cleanly for future inspection and maintenance.
Set the Outer Frame Level
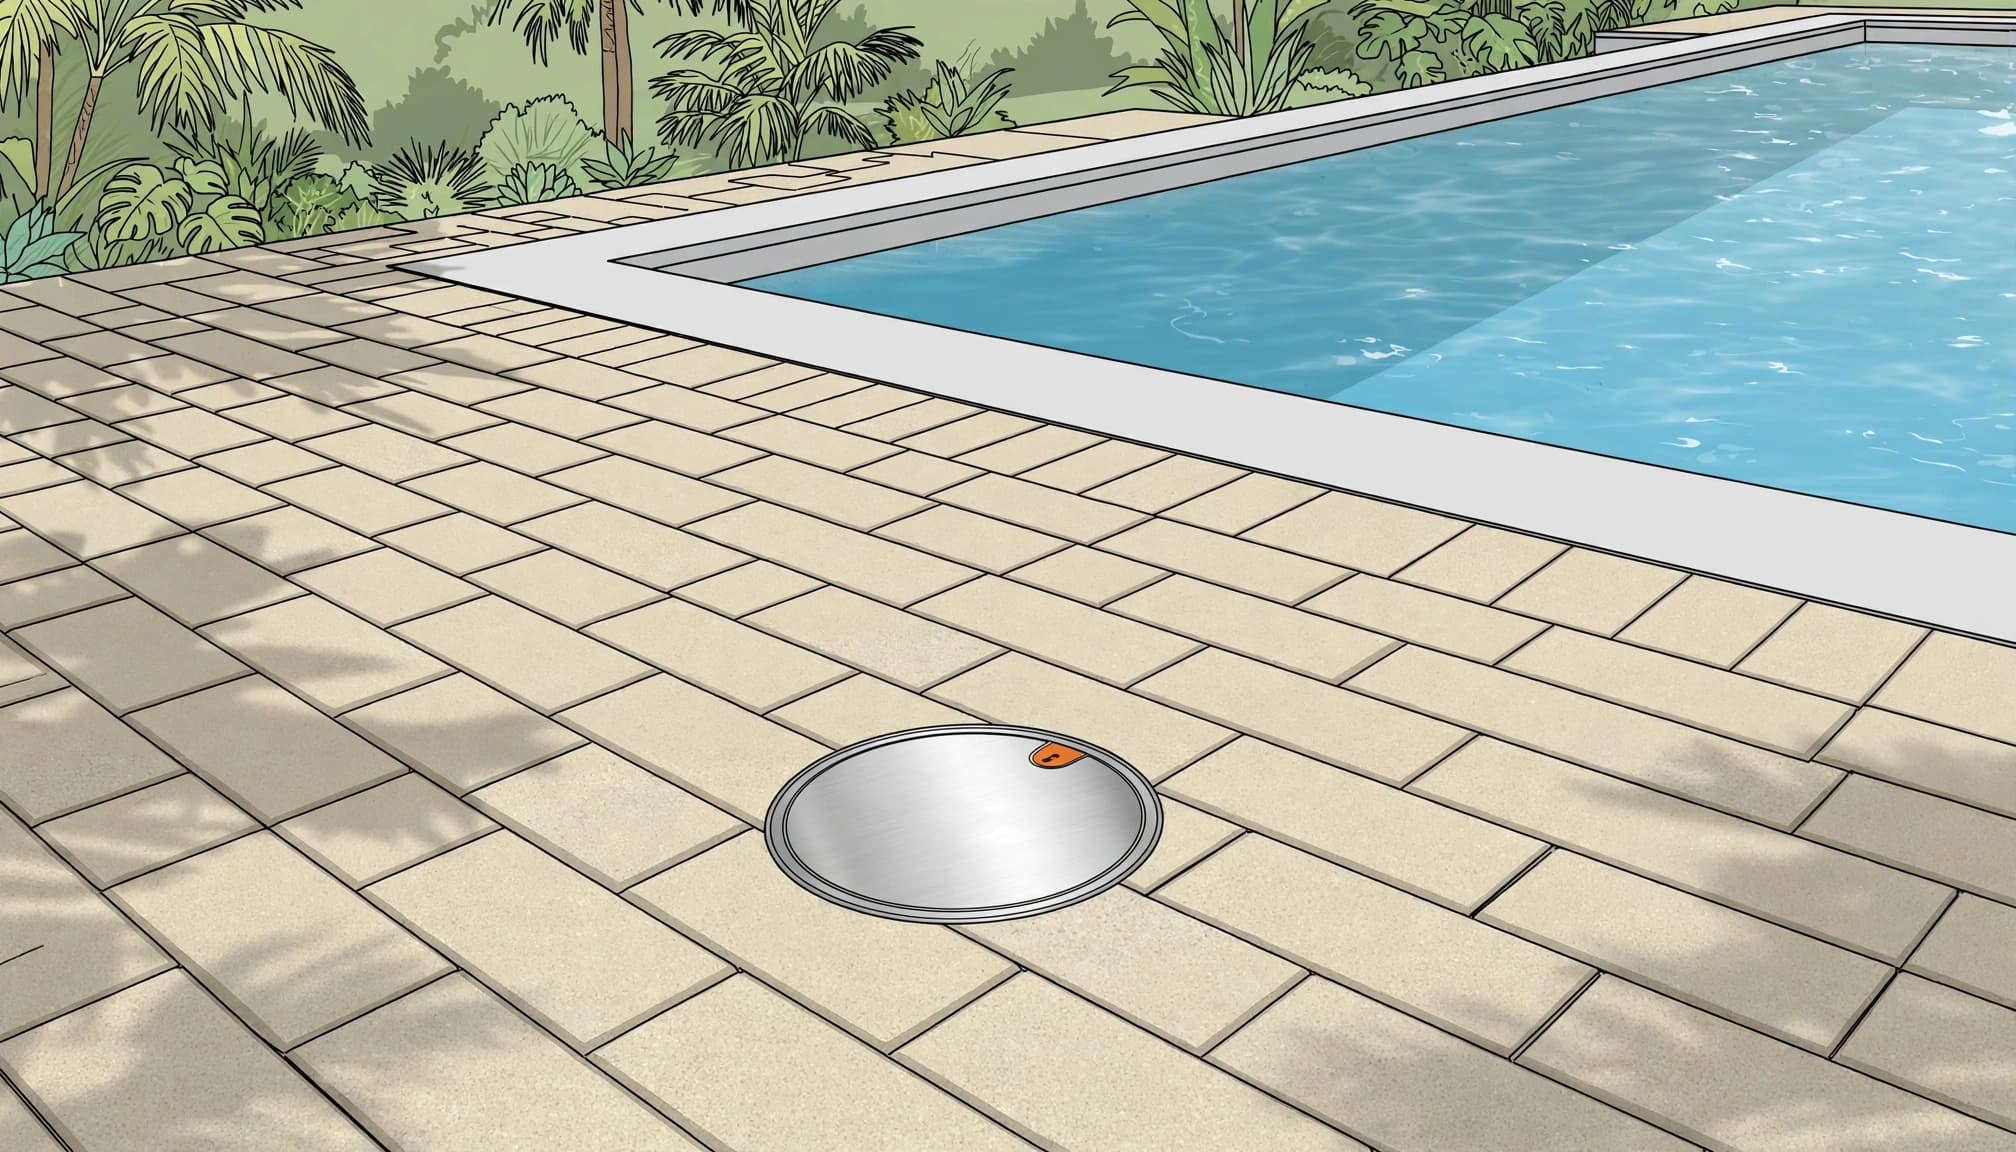
Install the edge frame for the stainless steel skimmer cover level with the completed deck for a flush finish. It must sit square over the opening and remain compatible with the existing skimmer system.
The frame should stay stable when pressure is applied around its perimeter. A slightly irregular opening may need an adjustable frame, collar, or support hardware approved for the system.
Don’t use surrounding pavers to force the frame into position. Correct a seriously out-of-square or unstable opening before installation.
A frame that is twisted or low will keep causing trouble. You may see chipped corners, a wobbly lid, or joints that open after a season of traffic.
Cut and Bond the Insert
Measure and mark the actual material for the tile insert before cutting. Preserve the surrounding pattern and joint direction, then dry-fit the piece in the tray.
Leave enough clearance for the insert and tray to lift out without catching. Timber decking may require a different support or tray detail, so don’t substitute it without checking the system’s rating.
Concrete covers weigh more than ordinary paver inserts. Confirm that the frame, tray, and box can support the added load.
Use the adhesive approved for the material and cover system. The tray also acts as an edge protector for the cut edges.
Keep adhesive out of the lifting path, and never bond the assembly to surrounding pavers. Let it cure fully before opening and closing the lid repeatedly.
Before installation, check the kit documentation for its 10 year warranty. Eligibility may depend on the approved adhesive, insert material, installation method, and local conditions.
For a visual walk-through, compare each part with your kit using the manufacturer’s access-cover installation directions. Then follow the selected kit’s installation instructions.
Concrete Decks and Older Pool Retrofits
A new pool build is the easiest time to plan a hidden skimmer cover. The pool contractor, deck crew, and paver installer can set the box height before the final surface goes down.
Still, existing pools can be retrofitted. I have found that older skimmer boxes may not be level, square, or adequately supported.
Before changing the deck, confirm local pool and building requirements. The work must preserve removable service access and proper drainage, not merely create a level-looking surface.
When a Conversion Pack Is Specified
Wet-pour concrete decks need a different recess and support detail than paver decks, so the insert can sit flush.
Use a concrete conversion pack only when the selected cover system specifies it. The measured inlay depth must meet the manufacturer’s requirements, often at 1.6 inches or greater.
Don’t pour concrete directly into a tray unless the system is expressly engineered for that application. Concrete covers can be heavy. The tray, frame, support point, and pool skimmer box must all be rated for that load.
Watch for Non-Standard Skimmer Boxes
Older pools may have cracked plastic collars, irregular openings, corrosion, nearby plumbing, or inadequate support. Stop and inspect the pool skimmer box before cutting deeper into the deck.
I also recommend calling 811 before digging near any pool equipment area. Calling 811 locates utilities, but it doesn’t shut down the pool system. Irrigation, electrical lines, and plumbing can be closer than expected. Have a professional inspect any uncertain electrical, plumbing, structural, or drainage conditions. A clean lid isn’t worth damaging a pipe or wire.
Opening, Cleaning, and Maintaining the Cover
Hidden skimmer covers blend into the deck, but they still need routine attention. Keep the safety key where the pool owner and service technician can find it, and show family members or your pool service company how the lid opens.
Insert the correct key into the lifting point and raise the removable access cover evenly. Don’t pry with a screwdriver, chisel, or knife. These tools can scratch the frame or break the stone insert.
Never permanently obstruct the lid with grout, sealant, adhesive, furniture, a planter, or another object. For pool safety, keep the cover stable, level, and free of debris in this wet-foot area.
Keep the Frame and Joints Clean
Even when you hide skimmer covers within the deck, inspect them routinely for movement or damage. Check the edge protector and frame for loosened edges, chipped insert corners, corrosion, or movement.
Sweep sand, leaves, and debris away from the narrow gap around the cover. If grit packs into the reveal, it can affect drainage around the frame and prevent the lid from lifting evenly.
First sweep the area clean, then use moderate pressure away from the joints if pressure washing is needed. Keep the wand moving, and never spray directly into the skimmer opening. Don’t use a cleaner that could damage the insert, frame, or surrounding pool finish.
If joint sand is missing after cleaning, replace it with a compatible product. Joint sand helps interlocking pavers stay locked together and keeps debris out of the base.
When Professional Installation Is the Better Call
A small lid replacement can be manageable DIY work when the deck is stable, the opening is square, and measurements are accurate. Before starting, check the frame or collar support, drainage, nearby utilities, insert weight, and compatibility with the existing pool system.
I recommend professional help when the skimmer box is cracked or the surrounding base has settled. It’s also wise when water collects on the deck, the opening needs structural correction, or local pool and building requirements apply. Pool equipment access needs to remain safe, easy, and reliable.
A qualified pool-deck or pool-service professional can inspect the pavers, base, joints, drainage, opening measurements, and frame support. They can also confirm the insert weight and existing system compatibility before recommending a repair. If you’re unsure about the work, consult a qualified local professional for a site assessment and estimate.
Frequently Asked Questions
Can I place pavers directly over a plastic pool skimmer lid?
No. A standard plastic lid is not designed to support a heavy paver and may flex, crack, or settle. Use a purpose-built access cover with a removable tray and supported insert instead.
How do I measure for pool skimmer lid pavers?
Measure the actual clear opening inside the deck, the support ledge, and the finished deck elevation. Also record the insert thickness, tray or frame dimensions, surrounding clearances, and the space needed to lift the cover out.
Should the skimmer cover be glued in place?
The paver or tile insert may be bonded to the approved tray with the manufacturer’s recommended adhesive. Do not glue the complete access cover to the surrounding deck or permanently obstruct the skimmer opening, because the lid must remain removable for cleaning and service.
How can I keep the skimmer lid flush with the pool deck?
Use a tray, adjustable supports, or collar that matches the measured inlay depth and the full material stack. Dry-fit the frame and insert first, then adjust the assembly so it sits level with the surrounding deck without relying on loose sand or excessive mortar.
When should I hire a professional to install a concealed skimmer cover?
Professional help is recommended when the skimmer box is cracked, the opening is unstable or out of square, the deck has drainage or settlement problems, or utilities and structural conditions are uncertain. A qualified pool-deck or pool-service professional can also confirm system compatibility, insert weight, and local requirements.
Final Thoughts
A good skimmer cover should blend into the deck while preserving safe lift-out access. The strongest result comes from accurate measuring, verified inlay depth, stable support, proper drainage, and careful cutting. Use an adjustable frame or collar where needed, and confirm compatibility with the existing pool system.
Pool skimmer lid pavers should conceal the cover without compromising serviceability, pool safety, or local pool and building requirements.